Apr 14, 2025
Apr 14, 2025
by Ankur Kamthe

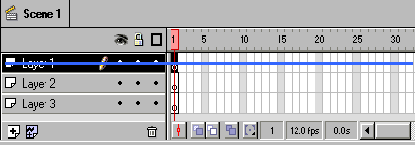
Layers are extremely important in Flash. The blue line in the above picture is what makes up a layer. You can have as many layers as you want. To add extra layers just right click and chose the 'Insert Layer' option from the dropdown menu. Otherwise just click on the ![]() icon and voila you have a second layer. To rename a layer just double click the text and type in the new name for the layer. Make sure the name resembles the object you are going to place on the layer. An important thing to keep in mind is that Flash allows only one animation per layer. You can move layers around by pulling/dragging the layer up or down. This is important in laying out your objects. If you want to create a picture with some text in the foreground, then the picture layer has to be behind the text or else the picture will cover the text.
icon and voila you have a second layer. To rename a layer just double click the text and type in the new name for the layer. Make sure the name resembles the object you are going to place on the layer. An important thing to keep in mind is that Flash allows only one animation per layer. You can move layers around by pulling/dragging the layer up or down. This is important in laying out your objects. If you want to create a picture with some text in the foreground, then the picture layer has to be behind the text or else the picture will cover the text.
Layer Modes

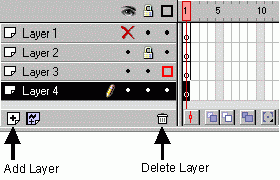
In the above picture, there are four layer modes. Knowing them will help you in the long run.
Current mode - This is the layer with the pencil by it. It denotes the current layer. In addition to this, the current layer will be highlighted.
Normal mode – In this mode the layer is untouched and nothing is going on in the layer.
Locked mode - On locking a layer you cannot select any of the object on that layer. The locked layer will have the picture of a small lock on it. A good example again, is if you wanted a background, you could lock it when you were finished, so that you could work with objects above that layer without accidentally selecting anything in your background. To unlock just click on the lock so that it disappears indicating that it is unlocked.
Hidden mode - This will not show or let you select any objects in the layer. It will have an ' X ' on this layer if it is hidden. It is nice when you want to concentrate on another object and you do not want the distraction of other objects or colors in the background.
Show All Layers As Outlines - A box being on that layer will notate this. It will not show the details in your graphics. It will simply show the very edges/outlines of the graphics.
So, if you need to
lock a single layer... simply click the dot on that layer that corresponds with the Eye, Lock, and Box at the top of the layers.
lock all the layers.... click the actual Lock itself at the top of the layers. On doing, this you will see small locks on every single layer except the one you are currently working in. This can apply to hiding all layers, and showing only outlines on all layers.
add a Layer click the add layer button, and the same goes into deleting a layer.
Till next time have fun with layers. Don’t let them LAY you down.
08-Mar-2001
More by : Ankur Kamthe